
 |
Basic Shape Proportions Hair Eyes & Forehead Nose & Cheeks Lips & Chin Neck & Chest Clothing |
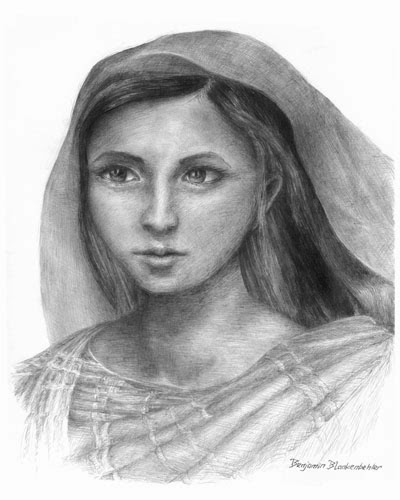
Portraits have always been the hardest thing for me to draw. But through study and lots of practice, I have learned a constructive technique. The subject in this step by step tutorial is being drawn straight out of my head. No photograph to copy, though I look at several artworks for reference.
Basic Shape
|
Start with a basic oval shape. This is an abstract outline of the skull and muscles around the skull. A second horizontal oval suggests the shape of the skull as it foreshortens back to the rear of the head. This second oval determines the direction the face is looking. For this tutorial, we will see the face slightly from the side and slightly from below. This position gives her dignity but is not confrontational, but calm.
The age, sex, ethnicity and other factors of our subject determine the shape of these ovals. But don’t worry, it does not have to be precise yet. You can practice this step by just drawing ovals around photographs of people’s heads. |

Proportions
   |
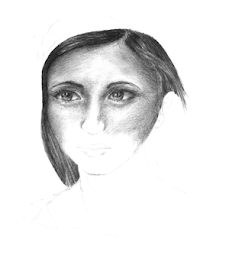
Now, we find the indents around the temple and jaw. In order to do this, we need to know proportions of the parts the head. You need to be familiar with the bone structure and muscles. I’m not saying you have memorize every anatomical part, but just keep in mind that this is what gives the head its shape. Draw a horizontal circle in perspective for the eyes. Draw another horizontal circle for the mouth. We will use these basic points to find the location of lips, nose, eyes, eyebrows, ears, and hair line. These all need to be symmetrical, so draw a vertical circle in perspective straight down the middle. Make the eyes equal distance away from this center, as well as the rest of the elements. Do all this in correct perspective.  Doing all this in perspective is difficult and will take some time. The proportions of the face depend on a person’s age, sex, race, and ethnicity. As a general guide, the eyes are halfway between the top and bottom. The nose tip is halfway between the eyes and bottom, and the bottom lip is halfway between the nose and bottom. Yes, I know. The image to the left looks freaky. I start to consider how the skin fits onto the parts of the head. Also, I introduced the neck, body, and clothes. I start to consider the subject’s expression, which is determined by how the muscles manipulate the other elements. This is all still anatomical, but will lead to the mood and composition. Many proportions also obviously need to be refined. Compositionally, I am interested in how the hair and clothing directs eye movement. I am also considering how shade and shadow help the eye movement, and add interest with contrast. As you can see, I start to lightly sketch where highlight and shadow should go, depending on the location of the light source. Note that I am still refining the proportions on the face throughout the entire drawing process. The proportions of the face need to be perfectly correct, because people recognize faces better than anything else in the world. Just a fraction of a millimeter off will make the face look warped. Look at the image through a mirror to make sure it is symmetrical. |
Hair
 |
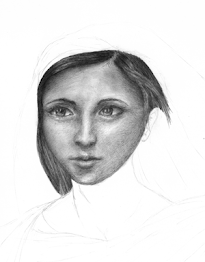
Start filling in the drawing with the hair, because it frames the face, and the face is easier to draw with the hair already there. The rest gets drawn in as the face gets drawn in. I increased the contrast of my image to the left to make it more clear what I have done.
Hair is a bundle of long strands that fall according to gravity. It is manipulated by the parts of the head that it flows around. Your hatching lines need to be long and thin. Do not hatch scribbling back and forth, but with long strokes in the direction of the hair. Hair is constantly bending and flowing, so the lightness is never quite the same. Bundles overlap other bundles. These are drawn as white lines of overlapping hair, establishing positive and negative space. Additionally, the sheen of the hair, highlight spots that reflect the most light, run horizontally to the back of the head. These blend in a kind of zig-zagged way with the shaded part, with plenty of mid-tone shades in between. Here is a close-up: |

Eyes & Forehead
 
|
The scalp is typically whiter where it meets the hair. This is why the part in the hair is lighter, and then quickly transitions to strands of hair. The light hits the forehead brightest at the highlight spot. It darkens to shade around the contortions above the eyebrows and around the sides of the forehead. Additionally, the hair overlaps the forehead to cause shadow, further darkening it.
The hatching of the skin needs to be extremely soft and gentle. I am only beginning to shade it in at this point. Use single strokes, not back and forth, at a variety of length, and blend as much as possible. For the purpose of this tutorial, I will keep the hatching at the skin rougher than it should be. Do not spread the eyes out too far. Make sure they are symmetrical to each other, and not too big. Also, keep in mind that they are sunk into the eye sockets of the skull. The eye is a round ball inside a wedge-shaped opening. The skin bugles and folds around the opening, and is punctuated by eye-lashes. The iris is typically larger than the eye opening. The white of the eye is not really all that white. Light reflection on the iris is typically whitest, and may be the whitest part of the entire drawing. The eye-lash casts shadow across the top of the eye. The eye is the most complex part of the drawing, and typically the first place people look. So carefully consider how everything goes together. While the eyes are symmetrical, they are not exactly the same. Draw one eye at a time. Tone down the parts you think are white, and brighten the highlights and reflections. Close-up: |


Nose & Cheeks
  |
Feminine eyebrows are different than masculine eyebrows. They run slightly diagonal up and then curve back down and thin at the ends. Locate the eyebrows at the brim of the eye-socket potrusion.
Cheeks follow the contour of the jaw and lower eye socket. The skin is plump between these two points. A hatch line in a separate direction can also suggest the rosy color on cheeks. The nose begins directly between the eyes. It protrudes in a straight line, and swells only slightly as it goes downward. Keep in mind that only the base of the nose is bone, and the rest is skin over some cartilage. Do not be intimidated drawing the nose. It may look funny, but just think of it as an object. The brightest spot in the drawing is typically on the point of the nose. This gets the most light. You don’t need to shade too darkly on either side of the nose, except at the eyes. I don’t like to draw attention to it, but the nose definitely needs to be present, to bring balance and stability to the face. The bottom of the nose receives plenty of shadow, especially at the tip and nostrils. The cleft between the nose and upper lip is suggested with longer shadow and a bright highlight. |
Lips & Chin
 |
The mouth is typically the same width as from iris to iris of the eyes. But the plump of the lip is about from nostril to nostril. Consider how the skin puffs slightly before it gets to the lip, with more shadow at this area at the ends. The skin meets the lip very softly. The lip creases and cracks and abruptly gets very dark as it enters the mouth.The upper lip is darker, with the center a little lighter, while the lower lip receives plenty of highlight. Shadow from the lower lip falls on the chin, emphasizing the lip’s size. While the eyes give us a window into who this person is, the lips communicate what this person wants to say. The expression you give the lips is therefore critical for the communication of the drawing. A highlight on the chin provides balance. At this point I feel confident enough to shade the skin to its correct darkness. |
Neck & Chest
 |
The face is mostly skin over bone. But the neck is muscle surrounding a spine. Consider how the skin curves around the throat and how the neck muscles cleft the skin slightly on either side. The collar bone, sternum, and humorous will also affect the skin at the chest. Otherwise it is all muscle.The jaw transitions to the neck with a long cast shadow. Other than that, I try to keep the neck and chest subtle for female figures, to keep the emphasis on the face. The neck is probably slimmer and longer than than real life, to appear more elegant. |
Clothing
 
|
I approach clothing as just another layer of material that goes over the body, like muscle over bone and skin over muscle. It falls with gravity and is shaped by its own physical properties and the body of the person inside.As I did with the skin around the eyes, I want to accent the edges, to give the cloth thickness and geometry. A wrinkle will receive a highlight and a shade around it. The dark hair reflects very slightly on the shawl around it, further darkening the shaded area of the shawl.
Hatch lines should emphasis the cross-stitching of the cloth. Cross-stitching might stand out more in highlighted areas, so adjust the blending of cross-hatching accordingly. Keep the folds of cloth organic and wavy, always keeping in mind how you want to frame the subject. Interact the hair with the cloth, maybe with some overlapping or whisps. Notice the subtle folds and creases in the head dress. Clothing feels more natural with some wrinkle in it. This takes careful hatching and consideration of how the body causes the cloth to fold. I kept the clothing light to add contrast with the dark hair. It is a nice neutral balance to provide a negative background for the figure. Edges are either darkened or lightened. Gradients darken slowly with the hatching style changing at the hightlights. Here is a closeup of the hatching: Thank you for following my tutorial! If this took you long to read, remember it took me a lot longer to draw. Be methodical and patient, and keep asking your self what you are trying to say with your art piece. Ink drawing portraits can be stunning as well. Use the same technique: |


 |
 |